Open Broadcaster Software (OBS) is a free and open source streaming and recording program.
In our last blog post, we talked about the advantages of streaming via OBS rather than directly through Facebook Live. But even the savviest of tech nerds can find it hard to get started with OBS.
Before we go any further let’s download, install and open OBS.
Once that’s done let’s focus on what you’re going to broadcast… There are many things you can stream or record with OBS. Tutorials, music performances, gaming or just simply talking to your audience about your favourite topic.
It’s good to decide now what it is you’d like to share.
Here is a basic ‘How To Get Started With OBS’ using a webcam and built-in microphone.
Step 1 – Create A Scene (and we don’t mean have a hissy fit!)
A scene is a group of sources. You need at least one scene to begin.
1. In the box labelled Scenes click the + sign. A pop-up window will appear
2. Name the scene. You can change it later if you need to
3. Click OK
https://www.youtube.com/watch?v=6qfGd4TvSKQ
Step 2 – Set Up Sources
Sources are what your audience sees and hears. With OBS you have a lot of options. But a basic broadcast will only need two: video and audio.
Video:
1. In the box labelled Sources click the + sign
2. Select Video Capture Device (this will be your webcam). A pop-up window will appear
3. Just click OK for now, you can rename this source later if you wish. Another pop-up window will appear
4. Click the box next to Device and select your webcam from the list. Leave Use Preset ticked for now and click OK.
5. Now you can adjust the size of the video to fit the screen
https://www.youtube.com/watch?v=MZApwuzgKHQ
Audio:
On opening OBS, Mic/Aux should be visible in the box labeled Mixer. This is the default setting and is using the built-in mic on your laptop or desktop (you should be able to see the green bar moving when you speak)
https://www.youtube.com/watch?v=5pplwkmoD6E
Step 3 – Set Up Streaming
Now all you need is an audience! Your streaming settings will differ slightly depending on where you’re streaming to (Facebook Live, YouTube, etc.)
Facebook Live (only for business or brand Pages):
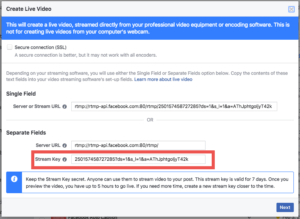
In Publishing Tools on your Facebook Page, go into Video Library in the Video section and click +Live in the top right corner.
Copy the Stream Key and go back to OBS
1. Click Settings in the bottom right of OBS
2. Click Stream
3. In the box labelled Service select Facebook Live
4. Paste your Stream Key from Facebook into the box labelled Stream Key
5. Once you are happy with how you look and sound, click Start Streaming and return to Facebook
6. Click Go Live
YouTube Live
In Creator Studio select Live Streaming. Fill in the information such as Name and Description. Copy the Stream Key from the bottom of the page and go back to OBS.
1. Click Settings in the bottom right of OBS
2. Click Stream
3. In the box labelled Service select YouTube
4. Paste your Stream Key from YouTube into the box labelled Stream Key
5. Once you are happy with how you look and sound, click Start Streaming and return to YouTube. You’re now live.
You can now control what your Facebook Live or YouTube stream looks like from OBS.
Some Cooler, Slightly More Advanced Things You Can Do
Adding multiple scenes means you can switch from one visual to another. Here are some ideas of how you could use this tool:
- Multiple webcams can be added to give different angles or close-up shots to your viewers – keep them interested!
- Multiple microphones can be added for better sound quality for music performances or if more than one person is speaking
- You can display different windows you have open – for example you can scroll down your website as you talk about it, give a tutorial, show people how to buy something on your online store
Have you tried Facebook Live or YouTube via OBS?


